Introduction
-
Java 21
-
Maven 3+ installed
-
Docker knowledge
-
The trainee is able to start a Docker container
-
We will use the mysql image during the training
-
Or if the group wants another, e.g. postgres?
-
-
Planning
We will create an application called CarApp in 4 days
-
The first four days are for learning and exercising
-
Consisting of: Explanation (by trainer) - Demo(by trainer) - DIY
-
Using the pomodoro technique
-
-
-
Optionally: The fifth day is for a case - and some final practical material
-
In groups or per person we choose a random topic - perhaps your personal hobby - and make the fullstack application we learned on the previous four days from scratch
-
Or we do some other practical stuff on the final day e.g. Dockerize your app and deploy in Kubernetes
-
-
IntellijJ?
1. Topic: Introducing Spring Boot
1.1. Introduction
During this section we will start the project with the name CarApp
1.2. Learning objectives
-
Start a project using http://start.spring.io
-
to open the project in IntelliJ
-
Describe the contents of
-
the Maven pom
-
the spring-boot-starters in the Maven pom
-
-
Start the Tomcat server
1.3. How: Introducing Spring Boot
You can start a Spring Boot project using the link http://start.spring.io
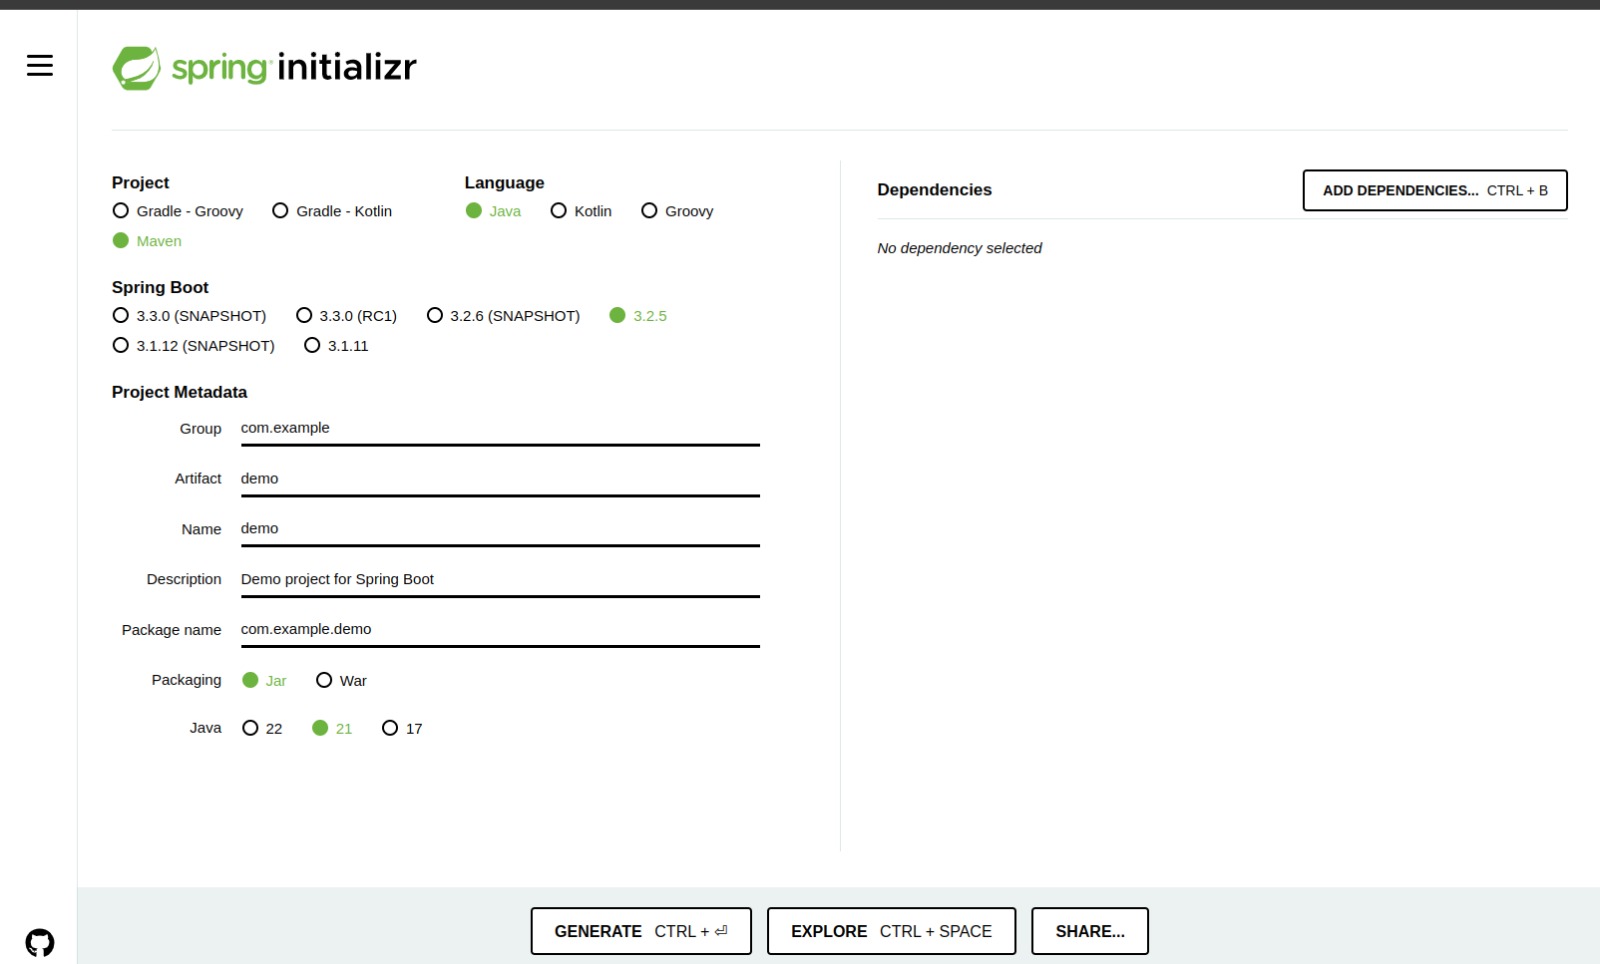
1.3.1. Settings for the project
-
Maven project
-
Java
-
Spring Boot version 3.2.3
-
Project metadata
-
Group: com.acme
-
Artifact: carapp
-
Package name: com.acme.carapp
-
-
Packaging: jar
-
Java 21 (JDK 17 minimal for a Spring Boot 3 project)
1.3.2. Maven starters
-
spring-boot-starter-actuator
-
spring-boot-starter-data-jpa
-
spring-boot-starter-data-rest
-
spring-boot-starter-web
-
spring-boot-devtools
-
h2
-
mysql-connector-java
-
spring-boot-configuration-processor
-
spring-boot-starter-test
1.4. Instructor Demo: Introducing Spring Boot
-
Start a project
-
to open the project in IntelliJ
-
Describe the contents of
-
the Maven pom
-
the spring-boot-starters in the Maven pom
-
-
Start the Tomcat server
1.5. Exercise: Introducing Spring Boot
Do the Exercise: Spring Boot Introduction now
1.6. Summary of this section
During this section we started our first application and ran it
In the following module - after the Hello World smoke test - we will see that we can improve this very small application with some minor issues
1.7. Further reading
Building an Application with Spring Boot |
|
Spring Boot Starters |
2. Topic: Hello world!
2.1. Introduction
In the previous module we created our first project from scratch so we now can start an empty Spring Boot app.
To be sure that everything is and will be fine during the upcoming days we want to smoke test it!
Creating a fundamental controller will be the subject of this module.
-
The domain classes - als called the 'Model' will land in: model
-
the REST controllers and related will land in: api
-
The service(s) will land in: service
-
The repository for persisting to DB will land in: persistence
2.2. Learning objectives
-
Create a Hello world controller to validate that Spring Boot is acting as expected
2.3. Why: Hello world!
Just, to validate that your machine with it’s firewall settings and other applications are not tempering with the expected behaviour to come
2.4. What: Hello world!
We will just copy and paste a Hello world controller to the api package and rerun the app
2.5. How: Hello world!
package com.acme.carapp.api;

import org.springframework.web.bind.annotation.GetMapping;
import org.springframework.web.bind.annotation.RequestMapping;
import org.springframework.web.bind.annotation.RestController;

@RestController
@RequestMapping("api/hello")
public class HelloController {

    @GetMapping("world") // full path is: http://localhost:8080/api/hello/world (also called an 'endpoint')
    public String sayWorld() {
        return "Hello world!";
    }
}
2.6. Instructor Demo: Hello world!
-
Copying and pasting the helloworld controller above and running it
2.7. Exercise: Hello world!
Do the Exercise: Hello world! now
3. Topic: Auto Configuration
3.1. Introduction
Spring Boot auto-configuration attempts to automatically configure your Spring application based on the jar dependencies that you have added. For example, if H2 is on your classpath, and you have not manually configured any database connection beans, then Spring Boot auto-configures an in-memory database
You need to opt-in to auto-configuration by adding the @EnableAutoConfiguration or @SpringBootApplication annotations to one of your @Configuration classes
In the previous module we made our application ready for building. Before getting started we have to know how Spring Boot handles Auto Configuration That will be the subject of this module.
-
We will use the annotation based autoconfiguration
3.2. Learning objectives
-
How Spring Boot handles Auto Configuration
-
Identify the necessary getting started annotations
-
Create Source code on the correct location so that Spring Boot will find the Components
3.3. Why: Auto Configuration
To make it easier to wire the component to each other in our application Simply stated, to make our live easter instead of writing XML files we will be using @EnableAutoConfiguration and related annotations
3.4. What: Auto Configuration
Spring Boot handles autoconfiguration using the SpringBootApplication annnotation
3.5. Instructor Demo: Auto Configuration
-
Browse through the SpringBootApplication annotation
-
And show the corresponding annotation in that SpringBootApplication annotation
3.6. Exercise: Auto Configuration
No exercise for this part
3.7. Further reading
Spring Boot Auto Configuration |
https://docs.spring.io/spring-boot/docs/2.0.x/reference/html/using-boot-auto-configuration.html |
4. Topic: Dependency Injection I
4.1. Introduction
In the previous module we learned that Spring Boot does autoconfiguration. But what does this configuration mean. The auto-configuration means that Spring Boot finds it’s way based on the jars we included. After that it will inject the dependencies of the Spring Boot application in each other
Getting familiar with dependency injection will be the subject of this module
4.2. Learning objectives
-
Describe how dependency injection works
-
Describe and implement the various @Component annotations for dependency injection
-
Describe and implement @Autowired to wire in @Component’s to configure and wire our application
4.3. Why: Dependency Injection
Dependency Injection is the reason why the Spring framework saw daylight. In 2002, Spring was started as a framework to make live easier developing Java EE applications. The name Spring was chosen because of the feeling of Spring as a season. We are always happy when Spring is there to end the Winter. The target of the Spring framework is and was to eliminate the hard part of Java Enterprise applications
4.4. What: Dependency Injection
-
Inversion of Control
-
The Hollywood principle
-
Don’t call us, we’ll call you
Which means that instead of wiring your classes using creating new instances and setting the fields op the classes, the entire tree of the application is '@Autowired' using Spring Boot
-
@Autowired is married to @Component
4.5. How: Dependency Injection
-
Components ::= A class annotated with some of the @Component or subtype can be injected into an other class
-
Beans ::= A method returning an instance of some class can be injected into an other class
-
@Component
-
@Controller
-
@RestController - adds ResponseBody to the Controller
-
-
@Service
-
@Repository
-
-
@Autowired annotation
-
required ::= true (whether or not this must be an available bean)
-
-
Injection types
-
Constructor injection
-
Setter injection
-
Field injection. Do not do this, but we do this here during the training. Refactor that later to Constructor or Setter.
-
-
Constructor injection ::= when required
-
Setter injection ::= when optional
-
Sometimes you see field injection. That might be easier to setup but avoid it in production and real case scenarios.
| We will see more about dependency injection under Dependency Injection part II regarding Bean injection |
4.6. Instructor Demo: Dependency Injection
-
Creating components with @Component
-
Show an overview of the above-mentioned annotations
4.7. Exercise: Dependency Injection
Do the Exercise: Dependency Injection I now
4.8. Takeaway
During this module we learned how to make our first component and wire that.
It is imperative to understand, but in contrast, you will work so much with this that it will become like eating sandwiches :-)
Therefore! In some of the upcoming modules we will learn that we can (also) make use of the @Repository annotation to make our very first repository with Spring Boot
4.9. Further reading
Spring Beans and Dependency Injection |
|
Spring and Spring Boot Frameworks: A Brief History - DZone Java |
https://dzone.com/articles/history-of-spring-framework-spring-boot-framework |
5. Topic: Hitting the Database
5.1. Introduction
In the previous module we learned that Spring Boot uses the principles of most expected || least surprised and configures the Database conform the dependencies we use
We will now see that we can configure our database more in the application.properties file
5.2. Learning objectives
-
Describe how to build a good application.properties file for Database access
-
Describe and implement the connection from a Spring Boot application to a database in general and especially for
-
MySQL ::= for Development, Testing and Production
-
H2 ::= for integration-testing
-
-
Identify some issues which might arise when configuration is invalid
-
Working with the in-memory database H2
5.3. What: Hitting the Database
We configure the DB in our application in the application.properties file
5.4. How: Hitting the Database
-
Choose the DB you want to use - MySQL here
-
Start a Docker container of the image mysql.
-
Create a Database in the Docker container
-
Create a user with sufficient privileges of the created Database
-
-
Land the starter for the DB in the project pom. Already done for us when getting-started
-
Configure the application.properties file for using the DB.
-
Start the server
-
If you leave out the spring.dataSource properties
-
Spring Boot will use the internal memory H2 database
-
And that will succceed if the scope of the H2 dependency is runtime
-
Be noted that normally the scope is test which is useful for making integration-tests, later more on this
-
5.5. Instructor Demo: Hitting the Database
How to connect to MySQL server
5.5.1. Using the docker compose file
-
We are going to save a so-called Docker compose file with the name compose.yaml
-
This file contains all the information about the Docker containers we want to run
-
Save this file in your spring boot directory for convenience
version: '3'
services:
  mysql:
    image: mysql/mysql-server:8.0.28
    container_name: carDb
    environment:
      - MYSQL_ROOT_PASSWORD=mysecretPassword2022!
      - MYSQL_DATABASE=carDb
      - MYSQL_USER=caruser
      - MYSQL_PASSWORD=carpass
    volumes:
      - mysql01:/var/lib/mysql
    ports:
      - 3306:3306
volumes:
  mysql01: {}
# To drop volume invoke: docker-compose down --volumesdocker-compose up -d (1)| 1 | Starts the container (up) and starts in the background as daemon (-d) |
5.5.2. Using docker
| Only when the docker-compose solution fails! |
docker container run -d -it --name my-local-mysql-server -e MYSQL_ROOT_PASSWORD=mysecretPassword2022! -p 3306:3306 mysqlmysql -h localhost -P 3306 --protocol=tcp -u root -pdocker container exec -it my-local-mysql-server bash
mysql -h localhost -P 3306 --protocol=tcp -u root -pcreate database carDb;| Note to self :-) Below fill in a username and password on the 'username' and 'password' locations |
create user 'caruser'@'%' identified by 'carpass';
grant all privileges on carDb.* to 'caruser'@'%';
flush privileges;
exit;
5.5.3. Create the correct application.properties file
-
Pick the fields below and copy and paste them and modify the username and password
-
Note trainer: explain the fields below
-
Start the server
-
After starting the server there should be no error messages regarding that there is no dependency to a DB such as H2, MYSQL or POSTGRES
5.5.4. Demo artifacts
spring.datasource.url=jdbc:mysql://localhost:3306/carDb
spring.datasource.driver-class-name=com.mysql.cj.jdbc.Driver
spring.datasource.username=caruser
spring.datasource.password=carpass

# Recreate or updte the database after stopping and starting ??? =>
## options for spring.jpa.hibernate.ddl-auto: none, validate, update, create, create-drop
spring.jpa.hibernate.ddl-auto=update

# log sql queries to console or not
spring.jpa.show-sql=true
5.6. Exercise: Hitting the Database
Do the Exercise: Hitting the Database now
5.7. Takeaway
During this module we learned how to make connection to MySQL using a Docker container
In the following module we will learn that we can (also) make use of the database with JPA to create tables and columns
5.8. Further reading
Spring Boot DataSource Configuration |
https://howtodoinjava.com/spring-boot2/datasource-configuration/ |
6. Topic: JPA
6.1. Introduction
In the previous module we learned how to get connected to the Database.
The next step is to make Tables in the Database and Columns in the Table.
Creating Tables and Columns using Java Persistence API (JPA) is the subject of this module
Class ::= Table Field ::= Column
6.2. Learning objectives
-
Describe and Implement JPA in an Spring Boot application
-
Have a complete understanding of @Entity related items such as @Entity, @Id and @GeneratedValue
6.3. What: JPA
Java Persistence API (JPA) is the framework which helps us persisting objects to Databases. Upto 2010/2012 we had to write our own queries to make SQL inserts and updates. Luckily now JPA comes to help …
-
@Entity (and it’s attributes 'name' and 'table')
-
name ::= the name of the entity when it is used during JPQL queries in the application
-
table ::= the name of the table which should be created in the database
-
-
@Column
-
For adjusting the constraints of the fields in the entity
-
-
@Id
-
This annotations tells JPA that this field is the primary key of the entity and that is a private long id during this training
-
-
@GeneratedValue
-
strategy ::= applicable GenerationType. GenerationType.IDENTITY during this training to have auto increment
-
| GenerationType.AUTO maps to GenerationType.IDENTITY. |
6.4. How: JPA
You can choose to create a private long id (primitive) or an object type private Long id Both are OK - and opinionated. The difference is that you can easily check for null if you use the object type. But you can also check for 0 (zero) when using the primitive type. Using the primitive type is a little faster. That means faster in nano-seconds. Stick to the team consensus. And some developers have the feeling that 0 is a valid value for a long id in Hibernate which is not the case, if it is 0 (zero) the entity is detached
-
Detached means that the entity is not attached to the database, so NOT saved yet and the primary key is unset
-
Attached means that the entity is attached to the database, so SAVED and the primary key is set.
| The error "Detached entity passed to persist" is a common error when you are trying to save an entity which has an id > 0 or null AND there is not yet a row in the db which corresponds which that entity. |
6.5. Instructor Demo: JPA
-
Create a public class
-
Annotate the class with @Entity
-
Add a mandatory field of type private long id
-
Annotatie the field id with @Id
-
Anotate the field id with @GeneratedValue(strategy = GenerationType.IDENTITY)
-
-
Add the other fields
-
Add the getters and setters for all fields except the setter for private long id
-
Start the server succesfully
-
Validate there is a table created with the same name as the class of the entity
-
Validate that in the table the columns of the fields of the class are generated
6.6. Exercise: JPA
Do the Exercise: JPA now
6.7. Takeaway
-
Describe and Implement JPA in an Spring Boot application
-
Have a complete understanding of related items e.g.
-
@Entity (and it’s attributes 'name' and 'table')
-
@Id
-
@GeneratedValue(strategy=…)
-
In the following module we will learn that we can use this entity in a Repository - which makes it easy to persist an entity to the database
Persisting an object to the database using a repository will be the subject of the next module
6.8. Further reading
Accessing Data with JPA |
|
Spring Data JPA |
7. Topic: Repository
7.1. Introduction
In the previous module we learned that we can create an @Entity which is persistable to the database. In short, an entity is mapped to a table and the fields are mapped to the columns of the table. In this upcoming module we will learn how to create, retrieve, update and delete an instance of that entity to the database
| Create, Retrieve, Update and Delete is called CRUD |
7.2. Learning objectives
-
Describe and Use the CrudRepository and JPARepository to persist to the database
-
Describe the differences between these two
-
Understand that during starting of the server Spring Boot will
-
Find the Repository interfaces(!) in the project
-
Read out the application.properties file and based on these setting
-
Create an implementing class of the repository interface(!) during starting the application which is able to persist to the DB
-
7.3. What: Repository
-
CrudRepository or JpaRepository
7.4. How: Repository
Create an interface which extends one of these mentioned above in our case JpaRepository
7.5. Instructor Demo: Repository
-
How to create a repo for a Car entity
7.6. Exercise: Repository
Do the Exercise: Repository now
7.7. Takeaway
During this module we learned how to make our first Repository for persisting cars to the DB
In the following module we will learn that we can (also) make use of the created Repository in our @RestController and in a later module we will also learn to add more methods and queries to the Repository.
7.8. Further reading
Spring Data JPA |
https://docs.spring.io/spring-data/jpa/docs/current/reference/html/ |
8. Intermezzo: Rest Principles
8.1. Introduction
In the next module we will learn how to create a RestController. Before that we should be familiar with the principles behind REST. And how to make a good rest api design and contract
Getting familiar with the principles of REST will be the subject of this intermezzo
8.2. Learning objectives
-
Describe the principles behind a REST api
-
Describe how a good REST api is build
-
Know what resource nesting is
8.3. Why and When: Rest Principles
Good fences make good neighbours
Mending Wall
-
Roy Fielding
-
How to send a request
-
GET, POST, PUT, PATCH
-
PathVariables
-
RequestParameters
-
How to interpret a response
8.4. What: Rest Principles
Roy Fielding |
|
What is REST |
|
REST api’s |
8.5. How: Rest Principles
For this training we use the following Car API documentation
8.6. Takeaway
During this intermezzo we glanced over how to make a good contract for the REST api
we learned how to make a valid request and response
In the following module we will make use of that knowledge during the topic RestController
8.7. Further reading
Roy Fielding |
|
What is REST |
|
REST api’s |
9. Topic: RestController
9.1. Introduction
In the previous module we learned how to make our first Repository for persisting cars to the DB.
In this module we will learn how to inject the repository in the RestController and to implement the RestController for Cars.
-
Some understanding of REST principles
-
Some basic knowledge of Postman
9.2. Learning objectives
-
Describe and implement a RestController conform the REST principles coined by Roy Fielding
-
Use the RestController with Postman
-
Identify some annotations related to @RestController
9.3. Why and When: RestController
When we want to render JSON objects from a JAVA object (entity)
From architectural point of view it is sometimes undesired to render an entity. Then we make a separate object called a Data Transfer Object which is rendered through the RestController. There are even good libraries such as MapStruct and more which do that work for us This rendering of a DTO is beyond scope of this training!
9.4. What: RestController
-
@RestController
-
@RequestMapping(method=…) or shorter
-
@GetMapping for getting a List or an instance
-
@GetMapping("{id}") long id, for getting one object
-
GetMapping("{car}") Car car, for getting one object
-
Spring Boot will try to to find the car by id, e.g. http://localhost:8080/api/cars/3 (will immediately fetch car with id: 3) or else throw an EntityNotFoundException
-
-
@PostMapping for creating
-
@PutMapping for updating
-
@DeleteMapping for deleting
-
-
@RequestBody for reading an object from the request
-
@PathVariable for reading a scalar from the url of the request
9.5. How: RestController
package nl.acme.beerapp.api;

@CrossOrigin
@RestController
@RequestMapping("api/beers")
public class BeerController {

	@Autowired
	private BeerRepository beerRepository;

	@GetMapping
	public List<Beer> list() {
		return this.beerRepository.findAll();
	}

	@PostMapping
	public Beer create(@RequestBody Beer beer) {
		return this.beerRepository.save(beer);
	}

	@GetMapping("{id}")
	public Beer findById(@PathVariable long id) {
		Optional<Beer> optionalBeer = this.beerRepository.findById(id);
		if(optionalBeer.isPresent()) {
			return optionalBeer.get();
		}
		else {
			return null; // oh oh, later we will learn to return Http status codes (404)
		}
	}

	@PutMapping("{id}")
	public Beer updateById(@PathVariable long id, @RequestBody Beer source) {
		Optional<Beer> optionalBeer = this.beerRepository.findById(id);
		if(optionalBeer.isPresent()) {
			Beer target = optionalBeer.get();
			target.setBrand(source.getBrand());
			target.setName(source.getName());
			target.setPercentage(source.getPercentage());

			return this.beerRepository.save(target);
		}
		else {
			return null; // // oh oh, later we will learn to return Http status codes (404)
		}
	}

	@DeleteMapping("{id}")
	public void deleteById(@PathVariable long id) {
		Optional<Beer> optionalBeer = this.beerRepository.findById(id);
		if(optionalBeer.isPresent()) {
			this.beerRepository.deleteById(id);
		}
	}
}
9.6. Instructor Demo: RestController
-
Creating a RestController
-
rloman, perform demo of @GetMapping("{id}") Car id
9.7. Exercise: RestController
Do the Exercise: RestController now
9.8. Takeaway
During this module we learned how to make our RestController. We rendered JSON and now should have a good understanding of making a fundamental REST api with Spring Boot.
In the following module we will learn that we can (also) make use of some status codes when rendering a REST response.
9.9. Further reading
Building REST services with Spring |
|
The Spring @Controller and @RestController Annotations |
https://www.baeldung.com/spring-controller-vs-restcontroller |
Spring Data REST guide |
10. Topic: Rest with Status codes
10.1. Introduction
In the previous module we learned that we can just return an object - or null when rendering a response from the RestController But, in the wild, we most of the time want to render an HTTP Status code which shows the visitor the result of the action. Based on the status code, clients like Angular, ReactJS or plain JS can interpret that statuscode as a valid or invalid response.
Learning how to adjust our RestController to the principle of the HTTP Status code will be the subject of this module
10.2. Learning objectives
-
Describe and implement the status codes of the REST responses
-
Use the class ResponseEntity<T> of the Spring Framework in a correct way
10.3. When: Rest with Status codes
When a client as Angular, ReactJS or vanilla JS has to know the statuscode of the response
10.4. What: Rest with Status codes
You might read this The status codes
10.5. How: Rest with Status codes
-
ResponseEntity<T> with examples:
-
201:Created return ResponseEntity.created(URL, beer);
-
For now 200 OK suffices for creation!
-
-
200:OK: return ResponseEntity.ok(beerService.findAll());
-
200:OK: return ResponseEntity.ok(this.beerService.save(beer));
-
202:Accepted: return ResponseEntity.accepted(…)
-
204:No content: return ResponseEntity.noContent().build();
-
404:Not Found: return ResponseEntity.notFound().build();
-
package nl.acme.beerapp.api;

@CrossOrigin
@RestController
@RequestMapping("api/beers")
public class BeerController {

	@Autowired
	private BeerService beerService;

	@GetMapping
	public ResponseEntity<Iterable<Beer>> list() {
		return ResponseEntity.ok(beerService.findAll());
	}

	@PostMapping
	public ResponseEntity<Beer> create(@RequestBody Beer beer) {
		return ResponseEntity.ok(this.beerService.save(beer));
	}

	@GetMapping("{id}")
	public ResponseEntity<Beer> findById(@PathVariable long id) {
		Optional<Beer> optionalBeer = this.beerService.findById(id);
		if(optionalBeer.isPresent()) {
			return ResponseEntity.ok(optionalBeer.get());
		}
		else {
			return ResponseEntity.notFound().build();
		}
	}

	@PutMapping("{id}")
	public ResponseEntity<Beer> updateById(@PathVariable long id, @RequestBody Beer source) {
		Optional<Beer> optionalBeer = this.beerService.findById(id);
		if(optionalBeer.isPresent()) {
			Beer target = optionalBeer.get();
			target.setBrand(source.getBrand());
			target.setName(source.getName());
			target.setPercentage(source.getPercentage());

			return ResponseEntity.ok(this.beerService.save(target));
		}
		else {
			return ResponseEntity.notFound().build();
		}
	}

	@DeleteMapping("{id}")
	public ResponseEntity<Void> deleteById(@PathVariable long id) {
		Optional<Beer> optionalBeer = this.beerService.findById(id);
		if(optionalBeer.isPresent()) {
			this.beerService.deleteById(id);

			return ResponseEntity.noContent().build();
		}
		else {
			return ResponseEntity.notFound().build();
		}
	}
}| The @CrossOrigin annotation above might demand some more explanation??? |
10.6. Instructor Demo: Rest with Statuscodes
-
Creating ResponseEntity<T> for the result of RestControllers
-
Seeing the differences in Postman
10.7. Exercise: Rest with Statusc odes
Do the Exercise: Rest with Statuscodes now
10.8. Takeaway
During this module we learned how to make proper use of HTTP Status codes so that clients consuming our REST api are aware of the result of the request
10.9. Further reading
The status codes |
|
Using Spring ResponseEntity to Manipulate the HTTP Response |
|
Created(201) |
https://developer.mozilla.org/en-US/docs/Web/HTTP/Status/201 |
11. Topic: Service
11.1. Introduction
In the previous module we learned that we have a repository to save all. We have a RestController to get all data to the UI. That might work but a better approach in a layer in between both of them which is called the service layer
Creating and working with Services will be the subject of this module
11.2. Learning objectives
-
Describe and implement a Service using the @Service annotation
11.3. What: Service
-
The service layer is responsible for the business logic
In the contexts of software architecture, service-orientation and service-oriented architecture, the term service refers to a software functionality or a set of software functionalities (such as the retrieval of specified information or the execution of a set of operations) with a purpose that different clients can reuse for different purposes, together with the policies that should control its usage (based on the identity of the client requesting the service, for example).
| In contrary to some other software-engineering-principles it is common practice to NOT make a Service interface More here on this subject |
-
The service layer abstract away from the saving of the object and abstracts away from the rest controller
-
The service layer is responsible for the business logic
-
The service layer starts and stops Transactions - more on this in a later section
11.4. Why: Service
-
Service contains the complex(er) code which is reusable of Controllers and UI layer
-
Separation of Concerns
-
MVC
-
Service ::= Business Logic
-
UI ::= User interface/screen
-
Controller ::= Request and Response
-
Model ::= JPA
-
-
DRY
-
Transactions
-
A service has a longer lifetime for the business and the place to be for complex(er) code
11.5. When: Service
-
Always :-)
-
At least, most of the time when we are dealing with a complex landscape
-
When using Java as language and Spring Boot as the framework we ARE in a complex landscape
11.6. How: Service
-
@Service annotation, which in fact - again - is a 'sub annotation' of @Component
-
view ::= the dinner card an later the food
-
controller ::= the waiter
-
model ::= the entities ::= the food in the refrigerator
-
And
-
the the service layer are the cooks
-
the database is the fridge
-
@Service
public class BeerService {

	@Autowired
	private BeerRepository beerRepository;

	public Iterable<Beer> findAll() {
		return beerRepository.findAll();
	}

	public Beer save(Beer beer) {
		return beerRepository.save(beer);
	}

	public Optional<Beer> findById(long id) {
		return beerRepository.findById(id);
	}

	public void deleteById(long id) {
		beerRepository.deleteById(id);
	}
}
11.7. Instructor Demo: Service
-
How to implement a service e.g. BeerService
11.8. Exercise: Service
Do the Exercise: Service now
11.9. Takeaway
During this module we learned how to make use of Service so that we can be sure that the complex code is in one central location which is reusable in the entire application!
In the following module we will learn that we can (also) make use of Transactions in the service layer
12. Topic: Personal Case
12.1. Introduction
In the previous modules we should have learned enough to make our first, personal Spring Boot application. During this personal case you will create a Spring Boot app for your own hobby.
12.2. Why: Personal Case
This personal case is meant to be sure that you can reproduce what you have learned in the previous modules.
12.3. What: Personal Case
Take some time to make a design for your Spring Boot application. An option can be to make an application for your hobby.
-
You need to have a REST API
-
You need to have a database
-
You have to have at least one entity with a minimum of three fields
-
You have to make a CRUD application
| There is two hours planned for this. |
12.4. Takeaway of this personal case
During this module we should have learned that we can reproduce the previous modules.
Part II: More advanced Spring Boot features
13. Topic: Dependency Injection II
13.1. Introduction
In one of the previous modules we learned that we can inject @Components into classes.
There might be a situation that want to create an instance of a class and set some properties of that Object. And even that class might be out of scope of your project. E.g. when that class is a part of a bigger library.
What if you want to inject that object in your classes?
Creating Beans will be the subject of this module.
So, welcome to the @Configuration and @Bean annotations!
13.2. Learning objectives
-
Describe how to create a Spring Bean using the following annotations
-
@Configuration
-
@Bean
-
13.3. Why and When: Dependency Injection II
When you want to inject a class which is not in our own source control
13.4. What: Dependency Injection II
-
@Configuration ::= This class will be inspected for @Bean annotations
-
@Bean ::= This method returns an object which is stored as a class under beanName = methodName
-
The beanName is the methodname
-
Overridden by the beanName attribute of @Bean
-
When beanName is available in context, that bean is used
-
When beanName is unavailable in context, the class type is used
-
When there are more than one classes of a Bean, an error occurs ⇒
org.springframework.beans.factory.UnsatisfiedDependencyException: Error creating bean with name '... ': Unsatisfied dependency expressed through
field 'carServies'; nested exception is org.springframework.beans.factory.NoUniqueBeanDefinitionException: No qualifying bean of type 'nl.acme.cars.common.service.CarService' available: expected single matching bean but found 2: carService, carServiceVersie2

at org.springframework.beans.factory.annotation.AutowiredAnnotationBeanPostProcessor$AutowiredFieldElement.inject(AutowiredAnnotationBeanPostProcessor.java:643)
13.5. How: Dependency Injection II
package nl.acme.weather.beans;

import org.springframework.boot.web.client.RestTemplateBuilder;
import org.springframework.context.annotation.Bean;
import org.springframework.context.annotation.Configuration;
import org.springframework.web.client.RestTemplate;

import java.time.Duration;

@Configuration
public class BeansConfig {

    @Bean
    public RestTemplate restTemplate() {

        RestTemplateBuilder builder = new RestTemplateBuilder();
        builder.setReadTimeout(Duration.ofSeconds(30));
        builder.setConnectTimeout(Duration.ofSeconds(10));

        return builder.build();
    }
}
13.6. Instructor Demo: Dependency Injection II
-
Creating a Bean as shown above
13.6.1. Takeaway
We should have learned that we can inject a Bean using @Configuration and @Bean
13.7. Exercise: Dependency Injection II
Do the Exercise: Dependency Injection II now
14. Topic: Transactions
14.1. Introduction
In the previous module we learned that we can make a Service in between the Controller and Repo
But what happens when you expect some kind of Exception during a Saving/Updating???
Things like that and tuning the behaviour of Transactions in the Spring Boot applications are the subject of this module.
14.2. Learning objectives
-
Describe the implications and features of the @Transactional annotation of Java EE as wel as Spring Boot
-
Use the @Transactional annotation to create a child transaction in a parent transaction
14.3. What: Transactions
-
@Transactional to implement transactions per public method
-
Which start when THEY ARE INVOKED FROM OUTSIDE THE SERVICE
-
| Remember this: The default setting is enough for starters. You get a new Transaction when the machine hits the @Transactional annotation. (The list below is somewhat (too) long.) |
14.4. How: Transactions
-
propagation
-
REQUIRED ::= Support a current transaction, create a new one if none exists.
-
SUPPORTS ::= Support a current transaction, execute non-transactionally if none exists.
-
MANDATORY ::= Support a current transaction, throw an exception if none exists.
-
REQUIRES_NEW ::= Create a new transaction, and suspend the current transaction if one exists.
-
NOT_SUPPORTED ::= Execute non-transactionally, suspend the current transaction if one exists.
-
NEVER ::= Execute non-transactionally, throw an exception if a transaction exists.
-
NESTED ::= Execute within a nested transaction if a current transaction exists, behave like REQUIRED otherwise
-
-
isolation
-
DEFAULT ::= Use the default isolation level of the underlying datastore.
-
READ_UNCOMMITTED ::= A constant indicating that dirty reads, non-repeatable reads and phantom reads can occur.
-
READ_COMMITTED ::= A constant indicating that dirty reads are prevented; non-repeatable reads and phantom reads can occur.
-
REPEATABLE_READ ::= A constant indicating that dirty reads and non-repeatable reads are prevented; phantom reads can occur.
-
SERIALIZABLE ::= A constant indicating that dirty reads, non-repeatable reads and phantom reads are prevented.
-
-
rollbackFor ::= Defines zero (0) or more exception classes, which must be subclasses of Throwable, indicating which exception types must cause a transaction rollback.
-
noRollbackFor ::= Defines zero (0) or more exception Classes, which must be subclasses of Throwable, indicating which exception types must not cause a transaction rollback.
-
value (which is of enum type Transactional.TxType)
-
REQUIRED ::= There must be a transaction or there will be a transaction started
-
REQUIRES_NEW ::= Creates a child transaction, more on this below
-
MANDATORY ::= There SHOULD ALREADY be a transaction started
-
SUPPORTS ::= Don’t care whether there is a transaction
-
NOT_SUPPORTED ::= If transaction active this method will run outside the transaction context and the parent is suspended.
-
NEVER ::= There SHOULD NEVER BE a transaction started already. And no transaction will be started here
-
-
rollBackOn
-
dontRollbackOn
| Both the @Transactional annotations (Java EE or Spring Boot) are valid and work properly in a Spring Boot application |
14.5. Demo: Transactions
-
The instructor will now show a default implementation of Transactions in the Service class
import org.slf4j.LoggerFactory;

// Demo: Send a letter after updating a Car but do not fail if the sending of the letter fails
class CarService {

    private static final Logger LOGGER = LoggerFactory.getLogger(CarService.class);

    @Autowired
    private BriefService briefService;

    @Transactional(Transactional.TxType.REQUIRED)
    public Car save(Car car) {
        final String recipient = "Max Verstappen";
        this.carRepository.save(car);
         try {
             this.briefService.send(car.getBrand(), recipient);
         } catch(NullPointerException nullPointerException){
             LOGGER.error("Failed to send letter to [{}] but the saving will be succesfully", recipient);
         }
    }
}

class BriefService {
@Transactional(Transactional.TxType.REQUIRES_NEW)
    public void send(String brand, String recipient) {
        // send a letter

        //!!! This method might crash and throw a NPE, then the sending of this letter - and perhaps saves - are rolledBack since NPE
    }
}-
Be sure that the REQUIRED and REQUIRES_NEW are in A DIFFERENT CLASS TYPE
-
Be aware that when the send method fails that the save method STILL succeeds
14.6. Exercise: Transactions
Do the Exercise: Transactions now
14.7. Takeaway
During this module we learned how to make good use of transactions and the @Transactional annotation so that we can be convenient about saving
14.8. Further reading
Introduction to Transactions in Java and Spring |
15. Topic: Query methods
15.1. Introduction
In the previous module we learned that we have some 'basic methods' in the JPARepository interface. That is even only halve of it … we can even define our own query methods without writing any implementation of these methods
Implementing query methods in our Repository will be the subject of this module
15.2. Learning objectives
-
Describe and Implement query methods in our Repository
-
Have a good understanding of the syntax of the query methods
15.3. When: Query methods
-
finding a car with a specific licensePlate
-
finding all cars brand and a milage below of above some milage
15.4. How: Query methods
-
List<Car> findByLicensePlate(String licensePlate);
-
List<Car> findByBrandOrderByLicensePlateAsc(String brand);
-
List<Car> findByBrandContaining(String brandPart);
| For a full description of the syntax of query methods see this link to Spring Data JPA - Reference Documentation on Query Methods |
15.5. Instructor Demo: Query methods
-
Create a query method in the CarRepository
-
Use the query method in the Service / repo with Postman
15.6. Exercise: Query methods
Do the Exercise: Query methods now
15.7. Takeaway
During this module we learned how to make our own query methods in the Spring Boot repository and know when and how to use it
In the following module we will learn that we can (also) make use of the @Query annotation to make our own custom query - also without the need to implement the interface methods …
15.8. Further reading
Spring Data JPA - Reference Documentation on Query Methods |
https://docs.spring.io/spring-data/jpa/docs/current/reference/html/#jpa.query-methods |
16. Topic: Named queries
16.1. Introduction
In the previous module we learned that we can make use of Query methods to expand the reach of our Repository. We can even make use of the @Query annotation to make our own custom query - also without the need to implement the interface methods …
The implementation of the Named queries in Spring Boot will be the subject of this module
16.2. Learning objectives
-
Describe and implement how to implement native queries with Spring Boot
16.3. Why and When: Named queries
When the standard methods of the JPARepository interface+the query methods are not sufficient
16.4. How: Named queries
@Repository
public interface CarRepository extends JpaRepository <Car, Long> {

    @Query("select c from Car c where c.brand like %?1%")
    List<Car> findByCarBrandContains(String brand);
}@Repository
public interface CarRepository extends JpaRepository <Car, Long> {
@Query(value = "select * from CAR where CAR.brand like %?1%", nativeQuery = true)
List<Car> findByCarBrandContainsAsNativeQuery(String brand);
}16.5. Instructor Demo: Named queries
-
Showing and creating some Named Queries
-
Using the variables which are injected in the query string
16.6. Exercise: Named queries
Do the Exercise: Named queries now
16.7. Takeaway
During this module we learned how to make named queries so that we can make queries when everything else fails to implement the very specific query
16.8. Further reading
Spring Data JPA - Reference Documentation on @Query |
https://docs.spring.io/spring-data/jpa/docs/current/reference/html/#jpa.query-methods.at-query |
17. Topic: Profiles and Properties
17.1. Introduction
The default profile is always active in a Spring Boot application. Whether there is or there is not an application.properties file
In the previous modules we learned that we can use the application.properties file for setting properties for the environment such as the Database. But what is the environment. Is that dev, test, integration-test, stage or prod? Or even something else. That’s why Spring Framework named their environment specific stuff a profile
You can set and override property keys per profile.
How to create a Profile and create Properties per Profile are the subject of this module.
17.2. Learning objectives
-
Describe the Profiles and Properties and implement them
-
Describe and implement the various ways of setting a profile
17.3. Why and When: Profiles and Properties
When you have multiple environments (e.g. develop, test, acceptance and production) the database has other properties for hostname, DB, username and password
17.4. What and How: Profiles and Properties
Add a file application-<profile>.properties in src/main/resources. That is enough to define a specific profile
-
In IntelliJ Ultimate
-
Run / Edit configurations / Active Profiles
-
-
In IntellJ Community Edition
-
Run / Edit configurations / Environment variables / Add spring.profiles.active=…
-
-
add -Dspring.profiles.active to the invoking of the app e.g.
-
java -jar -Dspring.profiles.active=acct ./carapp-0.1.0-SNAPSHOT.jar (for a single active profile)
-
java -jar -Dspring.profiles.active=development,staging ./carapp-0.1.0-SNAPSHOT.jar (for multiple active profile)
-
Remember that when Spring Boot starts, the default profile is always read. That means that application.properties is always read first. If there are more profiles active, the other application-<profile> files are read in subsequent order and keys in that file(s) override the existing keys in application.properties
| Define default stuff in the application.properties file and per profile specific in the corresponding file. |
-
Instead of creating the file in src/main/resources add the properties file in src/test/resources
-
Add @ActiveProfiles("<profile>") to an integration test
-
Add @Profile("<profile>") above the component(type) or bean(method)
You can also supply an external application.properties file on the same directory in the file system of the fat jar and that file will than be read at last
17.4.1. Examples of configuring
export spring_profiles_active=development,francien,poedel
java -jar ./target/weather-*.jarjava -Dspring.profiles.active=development -jar ./target/weather-*.jar<project>
.
.
.
<profiles> (1)
<profile>
<id>dev</id>
<activation>
<activeByDefault>false</activeByDefault>
</activation>
<properties>
<spring.profiles.active>development</spring.profiles.active>
</properties>
</profile>
<profile>
<id>prod</id>
<properties>
<spring.profiles.active>production</spring.profiles.active>
</properties>
</profile>
</profiles>
.
.
.
</project>
// In your shell (2)
mvn clean package -Pdev
java -jar ./target/weather-*.jar| 1 | Profiles somewhere in the pom as child of the project |
| 2 | Invoke this is some command shell |
17.5. Instructor Demo: Profiles and Properties
-
Describe the Profiles and Properties and implement them
-
Setting the ActiveProfile in an integration test
17.6. Exercise: Profiles and Properties
Do the Exercise: Profiles and Properties now
17.7. Takeaway
During this module we learned how to make use of profiles and properties so that we can now configure our spring boot application from external properties
In the following module we will learn that we can (also) make use of specific profiles for testing
17.8. Further reading
-
When there is NO (default) application.properties file OR no database configured in the existing application.properties file(s)
-
AND there are entities in the application
-
Spring Boot falls back to the H2 in memory database
-
But when there is no H2 dependency in the pom.xml then the application will fail to start
Common Application Properties |
https://docs.spring.io/spring-boot/docs/current/reference/html/application-properties.html |
Spring YAML Configuration |
18. Topic: Minor fixes
18.1. Introduction
In the previous modules we created our first app. After all we learned we can improve some minor issues. There are some things I personally like to improve before the project start although we handle it now but that is pure priority based.
The fixing of that will be the subject of this small topic
| We have to do this to have a better understanding of the next section: Testing |
18.2. Why: Minor fixes
-
A unit test ends with Test or Test
-
An integration test ends with IT
-
Symptom: The CarApplicationTests is now an @SpringBootTest which is during the test phase. That should be during integration-test phase
-
Cause: The test should end with IT
-
Solution: Rename the CarsApplicationTests class to CarsApplicationIT
-
Testing: During mvn clean test the test is NOT executed
-
Symptom: After the change above the test will not run during mvn clean verify
-
Cause: The maven-failsafe-plugin, although is in the Maven dependency managed, it is NOT added to the generated pom.xml
-
Solution: Add the maven-failsafe-plugin as plugin in the build section of the pom.xml (see below)
-
Testing: During mvn clean verify the test is executed
<plugin>
    <groupId>org.apache.maven.plugins</groupId>
    <artifactId>maven-failsafe-plugin</artifactId>
</plugin>| The version of the maven-failsafe-plugin can be omitted since that is already settled for us in the Spring Boot parent project. See the link below regarding Dependency versions |
-
Symtom: the version is 0.0.1.-SNAPSHOT which indicated that we are creating a bugfix for the 0.0 version
-
Cause: The version number is strange
-
Solution: Bump it to 0.1.0-SNAPSHOT
mvn versions:set -DgenerateBackupPoms=false -DnewVersion=0.1.0-SNAPSHOT-
During mvn clean test the version 0.1.0-SNAPSHOT is printed
18.3. Instructor Demo: Minor fixes
-
Fixing the before mentioned fixes
18.4. Exercise: Minor fixes
Do the Exercise: Minor fixes now
18.5. Further reading
Semantic Versioning |
|
Managed Versions |
https://docs.spring.io/spring-boot/docs/current/reference/htmlsingle/#appendix.dependency-versions |
19. Topic: Testing
19.1. Introduction
In the previous modules we learned so much that we are now at least! so far that we can - and have to test - all this in a repeatable and CI/CD container way
Learning the principle of developer testing and writing integration tests are the subject of this module
19.2. Learning objectives
-
Describe and implement Unittests and Integration test
-
Learn how to make use of the Junit5 library and the Spring Boot Testing library
19.3. Why, What and How: Testing
19.3.1. Intermezzo: Unit vs Integrationtest
-
Scope: Unit tests focus on testing individual units or components of code in isolation. A unit typically refers to a single class or method.
-
Dependencies: Unit tests are usually written to test a unit of code without its external dependencies. Dependencies are typically mocked or stubbed to isolate the unit being tested.
-
Purpose: Unit tests verify that each part of the codebase functions correctly at a granular level. They help ensure that each unit behaves as expected and adheres to its specification.
-
Speed: Unit tests tend to be fast to execute since they don’t involve external systems or dependencies.
-
Example: Testing a method in a service class without invoking the database or external services.
-
Scope: Integration tests focus on testing interactions between different parts of the system or modules to ensure they work together correctly.
-
Dependencies:: Integration tests involve real components and their actual dependencies, including databases, external services, file systems, etc.
-
Purpose: Integration tests verify that integrated components function correctly as a whole and communicate properly with each other. They test the interfaces and interactions between various modules or systems.
-
Speed: Integration tests are usually slower to execute compared to unit tests because they often involve more complex setup and teardown procedures and may interact with external systems.
-
Example: Testing the interaction between a service layer and a database by inserting data into the database and then retrieving it through the service layer.
In summary, while unit tests focus on testing individual units of code in isolation, integration tests verify the interactions and interfaces between different components or systems. Both types of tests are essential for ensuring the quality and reliability of software, but they serve different purposes and are typically executed at different stages of the development process.
19.4. Instructor Demo: Testing
-
Spring Boot integration Testing
-
@SpringBootTest
-
Explain it using the weather app
19.5. Exercise: Testing
Do the Exercise: Testing now
19.6. Further reading
Testing with Spring Boot and @SpringBootTest |
|
A weather app for learning Unittests, Mocking and Integration Testing |
When time permits
Topic: Bean Validation
Introduction
Bean validation in Spring Boot 3 is a feature that allows you to define constraints on your Java beans and automatically validate them. This validation is based on annotations placed on bean fields, specifying rules that the values of those fields must adhere to.
Using validation is the subject of this topic
Learning objectives
-
Work with Bean validation and know the corresponding annotations
What: Bean Validation
-
Annotations: Bean validation in Spring Boot primarily relies on annotations from the
javax.validation.constraintspackage. Some common annotations include@NotNull,@NotBlank,@Size,@Min,@Max,@Email, etc. These annotations are used to specify constraints on bean properties. -
Integration with Spring Boot: Spring Boot automatically integrates with Bean Validation via the Hibernate Validator, which is the reference implementation of the Bean Validation API. It’s included as a dependency in Spring Boot projects by default.
When a bean is processed in a Spring Boot application, Spring Boot automatically validates the beans annotated with validation constraints. This validation typically occurs during data binding (for example, when form data is submitted via a controller).
-
If validation fails, Spring Boot automatically detects the validation errors and generates error messages. These error messages can be accessed and handled in various ways, such as returning them as part of an HTTP response or binding them to a model for display in a view.
Overall, bean validation in Spring Boot simplifies the process of validating data within your application, ensuring that it meets the specified constraints before processing it further.
How: Bean Validation
public class User {
    @NotNull (1)
    @Size(min = 2, max = 50) (2)
    private String username;

    @NotNull (1)
    @Email (3)
    private String email;

    // getters and setters omitted
}| 1 | @NotNull ensures that the fields username and email are not null, |
| 2 | @Size ensures that the username length is between 2 and 50 characters |
| 3 | @Email ensures that the email field contains a syntactically valid email address |
Instructor Demo: Bean Validation
-
How to setup bean validation
Configuring Bean Validation
<dependency>
    <groupId>org.springframework.boot</groupId>
    <artifactId>spring-boot-starter-validation</artifactId>
</dependency>@Validated (1)
class AccountController(val service: AccountService) {
// ...
}| 1 | Add this to validate other than @Valid validations! See below |
@GetMapping("/saldo/{saldo}")
fun createAccount(@PathVariable @Positive saldo: Double): Account {
    val result = Account();
    result.id = 42
    result.saldo = saldo

    return result;
}@PostMapping
fun createAccount(@Valid @RequestBody account: Account): Account { (1)
return account
}| 1 | Add @Valid + @RequestBody to validate the body |
@Max(10000000) (1)
@Positive (2)
var saldo: Double = 0.0;| 1 | Validates for max saldo |
| 2 | Validates for being positive |
    // Rings when @Valid is used and the REQUESTBODY is invalid!
    @ResponseStatus(HttpStatus.BAD_REQUEST)
    @ExceptionHandler(
        MethodArgumentNotValidException::class
    )
    fun handleMethodArgumentNotValid(
        ex: MethodArgumentNotValidException
    ): Map<String, String?>? {
        val errors: MutableMap<String, String?> = HashMap()
        ex.bindingResult.allErrors.forEach(Consumer { error: ObjectError ->
            val fieldName = (error as FieldError).field
            val errorMessage = error.getDefaultMessage()
            errors[fieldName] = errorMessage
        })
        return errors
}// Rings when @Validated and some @Min, @Max or other METHOD parameter is invalid
@ResponseStatus(HttpStatus.EXPECTATION_FAILED)
@ExceptionHandler(
ConstraintViolationException::class
)
fun handleConstraintViolation(
ex: ConstraintViolationException
): Map<String, String>? {
val errors: MutableMap<String, String> = HashMap()
ex.constraintViolations.forEach { violation ->
val fieldName: String = violation.propertyPath.toString()
val errorMessage: String = violation.message
errors[fieldName] = errorMessage
}
return errors
}Exercise: Bean Validation
Do the Exercise: Bean Validation now
Takeaway
During this module we learned how to make use of bean validation so that we can be sure that our send objects and method arguments are valid.
-
Add the spring-boot-starter-validation to your pom.xml to get started with jakarta bean validation
-
Bean validation is different from Hibernate validations e.g. @Column
-
We have @Validate, @Valid and the above mentioned.
-
@Validate ::= Above the controller class
-
@Valid ::= Combined with @RequestBody validates the requestbody
-
@NotNull, @Email, @Size, @Positive ::= In combination with @Validate above the controller validates this inline method parameters
-
-
Since Spring Boot 3.x the package structure is moved from javax to jakarta
-
Bear in mind that there is a significant difference between Hibernate validation and Bean validation
-
Hibernate is in package: jakarta.persistence
-
Bean validation is in package: jakarta.validation
-
-
See the exception handling methods in the controllers for reference
-
You can also create custom validators by implementing the
javax.validation.ConstraintValidatorinterface. This allows you to define custom validation logic for specific constraints that cannot be expressed using built-in annotations.
Further reading
Java Bean validation Basics |
|
Java Bean validation |
https://docs.spring.io/spring-framework/reference/core/validation/beanvalidation.html |
Internationalization of messages |
https://docs.spring.io/spring-boot/docs/3.2.3/reference/htmlsingle/#features.internationalization |
Topic: RestTemplate
Introduction
During this training we learned that we can use our app as a REST api. On the other side, there might be a reason that you want to invoke an other REST api from within our spring boot app
How to invoke an other REST api from within our spring boot app will be the subject of this module
Learning objectives
-
Describe and Implement the RestTemplate in a Spring Boot application
-
Use the RestTemplate to invoke an other REST api in the world
Why: RestTemplate
When you are acting as a REST client to invoke an other REST api. So in fact, when your app is a Service but also a Client to an other REST service.
What: RestTemplate
-
RestTemplate
How: RestTemplate
@RestController
@RequestMapping("api/users")
public class UserController {

    private RestTemplate restTemplate = new RestTemplate();

    final String api = "https://jsonplaceholder.typicode.com/users";

    @GetMapping
    public ResponseEntity<List> getUsers() {
        try {
            ResponseEntity<List> result = this.restTemplate.getForEntity(new URI(this.api), List.class);
            return result;

        } catch (URISyntaxException e) {
            e.printStackTrace();
        }
        return new ResponseEntity<>(HttpStatus.OK);
    }
}
Instructor Demo: RestTemplate
-
How to use Postman to invoke the Usercontroller above
-
Show you can use variables and object when using POST and PUT
Exercise: RestTemplate
Do the Exercise: RestTemplate now
Takeaway
During this module we learned how to make a REST client in our Spring Boot app so that we can invoke an other REST api to use in our REST api :-)
In the 2nd next module we will learn that we can (also) make use of JDBC Template. An other template which makes life easier for Spring Boot friends!
Topic: JDBC Template
Introduction
In the rare occasion we need to run native JDBC code we have JDBC Template
Learning objectives
-
How to make use of native JDBC code without having a Repo and even without having an Entity
-
That we can even query for results when we have no control of being a class an entity or not.
Why and When: JDBC Template
In the rare occasion we need to run native JDBC code we have JDBC Template
What and How: JDBC Template
package nl.acme.weather;

public class Customer {
    private long id;
    private String firstName;
    private String lastName;

    public Customer(long id, String firstName, String lastName) {
        this.id = id;
        this.firstName = firstName;
        this.lastName = lastName;
    }

    public long getId() {
        return id;
    }

    public void setId(long id) {
        this.id = id;
    }

    public String getFirstName() {
        return firstName;
    }

    public void setFirstName(String firstName) {
        this.firstName = firstName;
    }

    public String getLastName() {
        return lastName;
    }

    public void setLastName(String lastName) {
        this.lastName = lastName;
    }
}@SpringBootApplication
public class SpringBootJdbcTemplateApplication implements CommandLineRunner {
@Autowired
JdbcTemplate jdbcTemplate;
private static final Logger log = LoggerFactory.getLogger(SpringBootJdbcTemplateApplication.class);
public static void main(String[] args) {
SpringApplication.run(SpringBootJdbcTemplateApplication.class, args);
}
@Override
public void run(String... args) throws Exception {
log.info("Creating tables");
jdbcTemplate.execute("DROP TABLE customers IF EXISTS");
jdbcTemplate.execute("CREATE TABLE customers(" + "id SERIAL, first_name VARCHAR(255), last_name VARCHAR(255))");
// Split up the array of whole names into an array of first/last names
List<Object[]> splitUpNames = Arrays.asList("John Woo", "Jeff Dean", "Josh Bloch", "Josh Long").stream()
.map(name -> name.split(" ")).collect(Collectors.toList());
// Use a Java 8 stream to print out each tuple of the list
splitUpNames.forEach(name -> log.info(String.format("Inserting customer record for %s %s", name[0], name[1])));
// Uses JdbcTemplate's batchUpdate operation to bulk load data
jdbcTemplate.batchUpdate("INSERT INTO customers(first_name, last_name) VALUES (?,?)", splitUpNames);
log.info("Querying for customer records where first_name = 'Josh':");
jdbcTemplate.query("SELECT id, first_name, last_name FROM customers WHERE first_name = ?", new Object[]{ "Josh" },
(rs, rowNum) -> new Customer(rs.getLong("id"), rs.getString("first_name"), rs.getString("last_name")))
.forEach(customer -> log.info(customer.toString()));
log.info("Querying for customer records where last_name = 'Long':");
jdbcTemplate.query("SELECT id, first_name, last_name FROM customers WHERE last_name = ?", new Object[]{ "Long" },
(rs, rowNum) -> new Customer(rs.getLong("id"), rs.getString("first_name"), rs.getString("last_name")))
.forEach(customer -> log.info(customer.toString()));
log.info("Updating customer records where last_name = 'Long' to 'Loman:");
jdbcTemplate.execute(String.format("update customers set last_name='%s' WHERE last_name='%s'", "Loman", "Long"));
jdbcTemplate.query("SELECT id, first_name, last_name FROM customers WHERE last_name = ?", new Object[]{ "Loman" },
(rs, rowNum) -> new Customer(rs.getLong("id"), rs.getString("first_name"), rs.getString("last_name")))
.forEach(customer -> log.info(customer.toString()));
}
}Instructor Demo: JDBC Template
-
Running the code above and learn some related to JDBC Template
Exercise: JDBC Template
Do the Exercise: JDBC Template now
Takeaway
During this module we learned how to make use of native JDBC code without having a Repo and even without having an Entity! so that we can even query for results when we have no control of being a class an entity or not.
Further reading
Accessing Relational Data using JDBC with Spring |
WebFlux part I
Introduction
In one of the previous modules we learned that we can make regular (synchronous) RestControllers
If you compare that synchronous to a waiter in the restaurant, … it would be strange to have that waiter only for you, hence, getting the request of the meal, making it and returning (responsing :-) it
Wouldn’t it be better if the waiter is only getting the request and passing the hard work to some other collegae’s (threads) ?
The fixing of that problem will be the subject of this module
Learning objectives
-
Have knowledge regarding terms of async development as there is
-
Mono
-
Flex
-
Backpressure
-
-
Describe and Implement an aynchronous REST api using Spring Boot
Why and When: WebFlux
When there is a lot of load on your app and you have to handle them async as is for Twitter, Facebook, LinkedIn etc.
What and How: WebFlux
This article explains it very well!!!
Instructor Demo: WebFlux
-
In fact, we will do the exercise below in this demo for starters, and then you do it yourself
Setting up WebFlux
docker container run -dit --name some-mongo -p 27017:27017 mongo:latest-
Open the project 'asyn webflux with Spring Boot' and run it
-
Open the link above in What and How and run the POST, PUT and GET methods on http://localhost:8080
-
The POST and PUT with Postman
-
The GET with some Internet Browser which should show that the response is getting asynchronously
-
Takeaway
During this demo we started a Mongo DB container, a Spring Boot app and ran the application.
It must have been set in your mind that after starting the application and opening http://localhost:8080 (at the end of the demo) that the response were getting asynchronousely - dropped after each other in the browser window
Exercise: WebFlux
Do the Exercise: WebFlux now which is in fact the same as doing the demo steps above to get familiar with asynchronousely programming with Spring Boot
| There is also a nice Bonus exercise below the default exercise which shows WebClient |
Takeaway
During this module we learned how to make an async application with Spring Boot so that we can make an application with can sustain a very heavy load
Further reading
| The links below are also used above during demo and exercises |
Building Async REST APIs with Spring WebFlux - Spring Boot WebFlux Example - HowToDoInJava |
https://howtodoinjava.com/spring-webflux/spring-webflux-tutorial/ |
Github code Spring Boot WebFlux Example |
WebFlux part II
Introduction
In the previous module we learned the beginning of WebFlux. During this module we will dive deeper into WebFlux
Learning objectives
-
How to work with WebFlux
-
How the principes are under the hood of WebFlux
Why: WebFlux
Spring WebFlux is part of the Spring ecosystem, designed for building reactive, non-blocking web applications. It is an alternative to Spring MVC, optimized for high concurrency and scalability.
🔑 Benefits of WebFlux
-
Reactive & Non-blocking
-
Uses the Reactive Streams API (
Flux,Monofrom Project Reactor). -
Non-blocking I/O allows handling more concurrent requests on the same hardware.
-
-
Better Scalability
-
Ideal for applications with thousands or millions of concurrent connections.
-
Well-suited for microservices, APIs, and event-driven systems.
-
-
Streaming Support
-
Supports real-time data streaming (SSE, WebSockets, reactive streams).
-
Useful for dashboards, chat applications, or stock tickers.
-
-
Backpressure Handling
-
Built on the Reactive Streams specification with backpressure support.
-
Prevents resource exhaustion under heavy load.
-
-
Functional Programming Style
-
Offers annotation-based controllers and functional routing (
RouterFunction,HandlerFunction). -
Enables more declarative and lightweight APIs.
-
-
Modern Stack Alignment
-
Integrates with reactive databases (R2DBC, MongoDB Reactive, Cassandra Reactive).
-
Fits cloud-native and microservice architectures.
-
🚀 When to Use WebFlux?
-
High concurrency applications (e.g., APIs handling thousands of requests/sec).
-
Real-time apps (chat, streaming, dashboards).
-
Microservices using reactive communication patterns.
-
Integrations with reactive NoSQL or messaging systems.
⚠️ When Not to Use WebFlux?
-
Simple CRUD apps with low concurrency → Spring MVC is simpler and sufficient.
-
If dependencies (e.g., JDBC) are blocking, WebFlux offers little benefit.
✅ In Short
Use Spring WebFlux when you need scalability, non-blocking I/O, and real-time streaming. Use Spring MVC for traditional, low-scale, blocking applications.
What: WebFlux
Spring WebFlux is a part of the Spring Framework introduced in version 5. It is a framework for building reactive, non-blocking, and asynchronous web applications.
Key Characteristics
-
Built on Reactive Streams and Project Reactor.
-
Provides non-blocking I/O for better resource utilization.
-
Supports both annotation-based controllers (similar to Spring MVC) and functional routing APIs.
-
Integrates with reactive databases and message brokers (e.g., R2DBC, MongoDB Reactive, Kafka Reactive).
Supported Use Cases
-
Applications requiring high concurrency with limited resources.
-
Real-time applications such as chat, dashboards, and streaming services.
-
Microservices and cloud-native systems that benefit from reactive programming.
Difference from Spring MVC
-
Spring MVC: Synchronous, thread-per-request, blocking model.
-
Spring WebFlux: Asynchronous, event-loop, non-blocking model.
In Short
Spring WebFlux is the reactive web framework in the Spring ecosystem, designed for scalability, efficiency, and modern real-time applications.
How: WebFlux
Using Spring WebFlux in a Spring Boot Project
<dependency>
  <groupId>org.springframework.boot</groupId>
  <artifactId>spring-boot-starter-webflux</artifactId>
</dependency>package nl.acme.app.model;
public record Demo(int age, boolean stop) {
}package nl.acme.app.api;
import lombok.RequiredArgsConstructor;
import nl.acme.app.model.Demo;
import org.springframework.http.MediaType;
import org.springframework.web.bind.annotation.*;
import reactor.core.publisher.Flux;
@RestController
@RequestMapping("api/demo")
@CrossOrigin
@RequiredArgsConstructor
public class DemoController {
@GetMapping(value = "/generateRandomNumbers", produces = MediaType.TEXT_EVENT_STREAM_VALUE)
public Flux<Demo> generateStream(@RequestParam(defaultValue = "10") int max) {
return Flux.range(1, max).handle((n, sink) -> {
try {
Thread.sleep(300);
} catch (InterruptedException e) {
sink.error(new RuntimeException(e));
return;
}
sink.next(new Demo(n, n==max));
});
}
}Using Spring WebFlux in an Angular project
import { Component, OnDestroy } from '@angular/core';
import { Subscription } from 'rxjs';
import { ChatService } from '../../service/chat.service';
import { MarkdownPipe } from '../../pipes/markdown.pipe';
import { SafeHtml } from '@angular/platform-browser';
import { ChatDto } from '../../model/chat-dto';

@Component({
  selector: 'app-streaming',
  imports: [],
  templateUrl: './streaming.component.html',
  styleUrl: './streaming.component.scss'
})
export class StreamingComponent implements OnDestroy {
  data: string[] = [];
  prompts: string[] = [];
  responses: SafeHtml[] = [];
  private streamSubscription!: Subscription;

  constructor(
    private readonly chatService: ChatService,
    private readonly markdownPipe: MarkdownPipe
  ) { }

  callAi(prompt: HTMLInputElement): void {
    let response: SafeHtml = '';
    let streamResponse: string = '';
    let myPrompt = prompt.value;
    this.prompts.push(prompt.value);
    this.responses.push(response);
    let currentChatId = this.prompts.length - 1;
    prompt.value = '';

    this.streamSubscription = this.chatService.streamChat(myPrompt)
      .subscribe({
        next: (msg: ChatDto) => {
          if (msg.finishReason !== 'STOP') {
            streamResponse += msg.text;
            console.log("Current chat id: "+currentChatId)
            this.responses[currentChatId] = this.markdownPipe.transform(streamResponse);
          }
        },
        error: (err: any) => console.error('Stream error:', err)
      });
  }

  ngOnDestroy(): void {
    if (this.streamSubscription) {
      this.streamSubscription.unsubscribe();
    }
  }
}<h3>Streaming Chat</h3>
<div class="input-group mb-3">
<input type="text" class="form-control" placeholder="Stel vraag" aria-label="Recipient's username"
aria-describedby="button-addon2" #inputBox type="text" (keyup.enter)="callAi(inputBox)">
<button class="btn btn-outline-secondary" type="button" (click)="callAi(inputBox)">Verstuur</button>
</div>
@for (prompt of prompts; track $index) {
Chat id: {{ $index }}
<br>
<div class="p-3 mb-2 bg-secondary-subtle text-secondary-emphasis rounded-4 bg-gradient">
{{ prompt }}
</div>
<div [innerHTML]="responses[$index]"></div>
}export interface ChatDto {
text: string;
finishReason: string; // 'STOP' or ''
}import { Injectable, NgZone } from '@angular/core';
import { Observable } from 'rxjs';
import { environment } from '../../environments/environment';
import { HttpParams } from '@angular/common/http';
import { ChatDto } from '../model/chat-dto';
@Injectable({
providedIn: 'root'
})
export class ChatService {
private readonly baseUrl = `${environment.apiUrl}/demo`;
constructor(private readonly zone: NgZone) { }
public sendInputValue(prompt: string): Observable<ChatDto[]> {
const params = new HttpParams().set('prompt', prompt);
return new Observable<ChatDto[]>(observer => {
const eventSource = new EventSource(`${this.baseUrl}/ai/generate?${params.toString()}`);
eventSource.onmessage = event => {
// console.log('Received message', event.data);
const data: ChatDto = JSON.parse(event.data);
console.log(typeof (data));
console.table(data);
observer.next([data]);
};
});
}
streamChat(prompt: string): Observable<any> {
let chat: ChatDto;
const params = new HttpParams().set('prompt', prompt);
const url = `${this.baseUrl}/generateRandomNumbers?${params.toString()}`;
return new Observable<any>(observer => {
const eventSource = new EventSource(url);
eventSource.onmessage = event => {
// console.log('Received message', event.data);
const data: any = JSON.parse(event.data);
console.log(data)
// console.log("Typeof ", typeof (data));
// console.log("Data ", data.result.output.content);
// console.log(JSON.stringify(data, null, 2));
// console.table(data);
this.zone.run(() => {
chat = {
text: data.age,
finishReason: data.stop ? 'STOP': ""
};
observer.next(chat);
if (chat.finishReason === 'STOP') {
console.log("Stopping, age is: "+chat.text)
eventSource.close();
}
});
};
// Handle error events
eventSource.onerror = error => {
this.zone.run(() => {
observer.error('EventSource error: ' + error);
});
eventSource.close();
};
// Cleanup when the Observable is unsubscribed
return () => {
eventSource.close();
};
});
}
} "marked": "^15.0.7",
"rxjs": "~7.8.0",
"tslib": "^2.3.0",
"zone.js": "~0.15.0"import { Injectable, Pipe, PipeTransform } from '@angular/core';
import { DomSanitizer, SafeHtml } from '@angular/platform-browser';
import * as marked from 'marked';
@Injectable({
providedIn: 'root'
})
@Pipe({
name: 'markdown'
})
export class MarkdownPipe implements PipeTransform {
constructor(private readonly sanitizer: DomSanitizer) {}
transform(value: string): SafeHtml {
if (!value) {
return '';
}
// Converteer Markdown naar HTML
const html = marked.parse(value, { async: false});
// Maak de HTML veilig voor Angular
return this.sanitizer.bypassSecurityTrustHtml(html);
}
}Instructor Demo: WebFlux
-
Showing Postman with the created WebFlux / Reactive / DemoController
-
Showing a chrome browser with the created WebFlux / Reactive / DemoController
-
Showing Angular with the created WebFlux / Reactive / DemoController
Exercise: WebFlux
Add a Reactive controller to your / a spring boot project
Further reading
Spring WebFlux Tutorial |
https://howtodoinjava.com/spring-webflux/spring-webflux-tutorial/ |
Spring Boot Reference WebFlux |
https://docs.spring.io/spring-framework/reference/web/webflux.html |
Ktor.io - a Kotlin async webclient |
|
R2DBC – Reactive Relational Database Connectivity |
|
Flux — Emitting Items Programmatically |
https://medium.com/@ranjeetk.developer/flux-emitting-items-programmatically-387860d19d04 |
Liquibase
Introduction
During this module we will learn working with Liquibase. That is; configuring it in Spring Boot and using it with the IntelliJ IDEA.
Learning objectives
-
Know how to setup Liquibase in a Spring Boot project
-
Work with Liquibase in IntelliJ
-
Use the Maven Plugin of Liquibase
Why: Liquibase
Liquibase is used to manage database schema changes in a controlled, automated, and reliable way. Instead of applying raw SQL scripts manually or relying on ad-hoc migration practices, Liquibase provides a structured framework for database version control and deployment.
Key Benefits of Liquibase
-
Database Version Control
-
Tracks schema changes in a versioned format (via changelogs in XML, YAML, JSON, or SQL).
-
Makes it easy to know what changed, when, and why.
-
-
Automation & CI/CD Integration
-
Works well with Jenkins, GitHub Actions, GitLab CI, and other DevOps tools.
-
Ensures schema changes are applied consistently across environments.
-
-
Cross-Database Support
-
Supports multiple databases (PostgreSQL, MySQL, Oracle, SQL Server, etc.).
-
Lets you use one changelog format that Liquibase translates into dialect-specific SQL.
-
-
Rollback Capability
-
Provides mechanisms to roll back changes if something goes wrong.
-
Much safer than applying SQL scripts directly.
-
-
Repeatability & Idempotence
-
Prevents re-running the same changes multiple times.
-
Each change has an identifier, so Liquibase knows if it’s already applied.
-
-
Developer Collaboration
-
Enables teams to contribute changes via pull requests just like application code.
-
Reduces conflicts and drift between environments.
-
-
Audit & Compliance
-
Maintains a database changelog history table.
-
Useful for compliance, auditing, and regulated environments.
-
🚀 Typical Use Cases
-
Agile development with frequent schema changes.
-
CI/CD pipelines where databases need to be migrated automatically.
-
Large teams working on shared databases.
-
Environments requiring rollback and auditing of database changes.
✅ In short
Liquibase makes database changes safe, traceable, and automated — turning schema evolution into a part of your regular DevOps workflow.
How: Liquibase
-
Add the dependency of Liquibase in the Spring Boot project
-
Use IntelliJ in the correct way for making changelog files, see demo below
Configure Database Connection
Or not; because default settings may suffice
liquibase.properties filechangeLogFile=db/changelog/db.changelog-master.yaml
url=jdbc:postgresql://localhost:5432/mydb
username=myuser
password=mypassword
driver=org.postgresql.Driver
classpath=/path/to/postgresql.jar <dependency>
<groupId>org.liquibase</groupId>
<artifactId>liquibase-core</artifactId>
</dependency>package nl.acme.app.model;
import jakarta.persistence.*;
import lombok.Getter;
import lombok.Setter;
@Entity
@Getter
@Setter
public class Car {
@Id
@GeneratedValue(strategy = GenerationType.IDENTITY)
private long id;
@Column(nullable = false)
private String brand;
@Column(nullable = false, unique = true)
private String licensePlate;
}-
Ctrl - Alt - A
-
View → Tool Windows → Persistence
-
Open JPA → Car → RightClick → New … → Liquibase Changelog
-
In the Diff Database Changelog Window
-
Select your correct entity, look for the pencil and select it … (a bit hidden)
-
-
Generate the changelog and save in src/main/resources/db/changelog/changes
-
<?xml version="1.0" encoding="UTF-8"?>
<databaseChangeLog
        xmlns="http://www.liquibase.org/xml/ns/dbchangelog"
        xmlns:xsi="http://www.w3.org/2001/XMLSchema-instance"
        xsi:schemaLocation="http://www.liquibase.org/xml/ns/dbchangelog
                      http://www.liquibase.org/xml/ns/dbchangelog/dbchangelog-4.31.xsd"
        objectQuotingStrategy="QUOTE_ONLY_RESERVED_WORDS">
    <changeSet id="1759128214769-1" author="rloman">
        <createTable tableName="car">
            <column autoIncrement="true" name="id" type="BIGINT">
                <constraints nullable="false" primaryKey="true" primaryKeyName="pk_car"/>
            </column>
            <column name="brand" type="VARCHAR(255)"/>
            <column name="license_plate" type="VARCHAR(255)"/>
        </createTable>
    </changeSet>
</databaseChangeLog>-
There might be some more changelog files
databaseChangeLog:
  - include:
      file: db/changelog/changes/2025-09-29-add-car-table.xml
  - include:
file: db/changelog/changes/2025-09-29-01-constraints.xml-
By Convention over configuration it runs now
Liquibase setup for project X
Maven targets handmatig uitvoeren
Export environment variabelen zodat mvn ze ziet: (of je gebruikt de maven properties plugin)
# cat .env | while read XX; do echo $XX; export $XX; done
Voer dan het liquibase target uit, bijvoorbeeld:
# mvn liquibase:status
Initiele setup
Setup liquibase in PRD
-
Gebruik een dagelijkse dump of maak een nieuwe met pg_dump
-
Kopieer de dump naar de PRD container:
-
rloman@lynx:~$ docker cp app_ACC.dump app-postgres-prd:/tmp/
-
Delete schema: public
-
Alle onderliggende tabellen worden ook verwijderd
-
-
Create leeg schema: public
-
Start de applicatie versie die liquibase ondersteunt
-
De liqibase migraties worden uitgevoerd:
-
tabellen in schema public worden aangemaakt inclusief liquibase change log
-
schema app wordt aangemaakt met student tabel
-
-
-
Restore startel data uit ACC in PRD
-
In de PRD container:
-
# cd /tmp
# pg_restore -U appuser -d app --clean app_ACC.dump
-
(Re)start de applicatie
Met SQL dump
Maak SQL backup in ACC docker container:
# cd /tmp
# pg_dump -U appuser -d app > app-dump.sql
# gzip app-dump.sql
Op de host, kopieer de dump van de ACC container naar de host en dan naar de PRD container:
rloman@lynx:~$ docker cp app-postgres:/tmp/app-dump.sq .
rloman@lynx:~$ docker cp app-dump.sql.gz app-postgres-prd:/tmp/
In de PRD docker container, restore de SQL dump:
# cd /tmp
# gunzip app-dump.sql.gz | psql -U appuser -d app
Instructor Demo: Liquibase
-
How to use the IntelliJ liquibase plugin
Exercise: Liquibase
-
Following the steps in the slides and the demo
-
Add liquibase to the project
-
Make your first Migration
-
Takeaway
During this module we learned how to make use of Liquibase so that we can migrate our Database
-
How do we handle a rollback in sourcecode when there was a column added which is NotNull???
Further reading
JPA Versioning |
https://www.jetbrains.com/help/idea/jpa-buddy-database-versioning.html#hibernate-envers-support |
Read the HELP.md in a Generated Project (see Liquibase) |
|
Spring Boot Data initialization |
|
Movie regarding JPA Buddy |
Case
-
Rebuild the entire application from scratch for your own hobby/interest per person. Or per group.
-
Add one to many JPA relationship between Car and Garage. Or @OneToOne for Holder
-
Run the Spring Boot application with Docker + Kubernetes
-
Using Minikube || Azure || An other container platform
-
-
Add actuator for health checking
-
Reference the weather-app
-
-
Add Pageable || Sorting to the Repository
-
RestTemplate testing using TestRestTemplate - reference weather app
-
Add Swagger documentation to the REST api
-
Creating an executable JAR using the spring boot maven plugin
-
NB: Azure does not allow to create executable JARs for deployment!
-
-
Implement Spring Security. NB: This is a pretty large exercise
Resources
Release notes
-
Set correct SNAPSHOT version. Fix deploy.sh since the structure has changed
-
Add WebFlux asciidoc slides
-
Add liquibase asciidoc slides
-
Add Liquibase demo
-
Move to structure like sb security and add WebFlux
-
Add summary
-
Add more examples of Profiles and Properties and how to create a profile
-
Add slides and exercise for bean validation
-
Add some for testing
-
Walked through and done for now
-
Improve upto Personal case I
-
Update part I
-
Other user in deploy
-
Remove the dates of september 2022
-
Fix an unknown host in deploy.sh
-
Fix: Move topic Minor Fixes to above testing to have a good flow
-
Add release notes from 1.0.0 upto and including 1.0.3
-
Mention that default profile is overridden
-
Final tip regarding entities and no DB
-
Add docker bash when trainee has no mysql client installed locally
-
Add personal case
-
Profiles and Properties (much!) smaller (feedback from group Zwolle june 2022)
-
Set the version to Java 17
-
Add link to more dataSource configuration
-
Fix a minor issue regarding snake_case
-
Add some better exercise regarding Transactions
-
More regarding @Crossorigin
-
Fix @GenerationValue
-
Rename package to acme
-
Set java version to 11
-
Add a hello world test controller for smoke testing
-
Add topic Dependency Injection part II
-
Add intermezzo: Rest principles and documentation
-
Improve the topics after v0.3.0
-
Improve Testing and beyond and make when time permits and future headers
-
Improve Profiles and Properties slides and exercies
-
Improve query methods and @Query
-
Improve topics Service and Transactions
-
Improve topic rest with statuscodes
-
Improve Restcontroller slides and exercises
-
Improve topic 7. Repository
-
Improve exercises upto and including JPA
-
Improve JPA
-
Improve the section hitting the database
-
-
Add topic WebClient which is a reference to a Bealdung exercise
-
Add topic: WebFlux
-
Add minor topic JDBC Template
-
Add topic: RestTemplate
-
Add topic Testing including Integration Testing
-
Add topic: Profiles and Properties part I
-
Add @Transaction topic started
-
Add topic: Named Queries
-
Add topic Repository with Query methods
-
Add topic: Service and Transactional
-
Add topic: Rest with HTTP Status codes
-
Add topic: RestController
-
Add topic: Repository
-
Add topic: Dependency Injection
-
Add topic: Java Persistence API
-
Add topic: Hitting the Database
-
Add topic: Spring Boot Auto Configuration
-
Add topic: minor fixes
-
Add topic: Spring Boot Introduction